
Thursday, November 27, 2014
Free Printable- LOVE
For the past month or so, my pastor has been speaking about what, "Love Does," and encouraging us to memorize 1 Corinthians 13. No, that's not a typo. He's encouraging us to read the WHOLE chapter. This is something that seems way beyond my capabilities (I'm pretty sure I have the mental capacity of a 70 year old woman when it comes to memorizing). However, I've managed to retain some of the beginning verses. I think I'm through verse 6 now? See, I can't even remember what verse I'm on. I digress. That all being said, this printable (along with every traditional wedding vow ever written) is inspired by that chapter. Feel free to print at will, but please do not reproduce for profit. Enjoy!
Sunday, November 23, 2014
Thankful For...Gold Flatware
Here it is. The Holidays. Thanksgiving, Christmas and New Year’s. Are we throwing Halloween in there now? Like most people I know, my hubby and I have to decide between going to my family’s get together or his. Up until recently, he has had to work on holidays, so I’m usually left to do my own thing, (but that’s beside the point). For the past 9 years or so, my aunt has held the baton for the Thanksgiving bash. She has a great house for entertaining. Open floor plan, new construction, high ceiling, fireplace, something I can’t afford...you know the type. Anyway, the one thing you can count on her pulling out for this special occasion is her gold flatware. My first experience with gold flatware was at her house on this very holiday. My emotions were multifarious (nice word, huh? I used a thesaurus). Being someone who loves things that are out of the ordinary, I was drawn to this flatware, but being someone who likes tradition (who am I?), I scoffed quietly at the display. At this point in my life I hated all things gold. I never wore gold jewelry and I most certainly wouldn’t have gold flatware. Since then, my feelings about gold have changed, but that could be a whole different post.
Thinking about that gold flatware and what she is going to do with the table scape, I’m excited for it to make it’s annual appearance. There are so many lovely things you could do with this flatware. Think of the possibilities! Actually, stop thinking, I’ll show you. I’ve scoured various pins on Pinterest and compiled a lovely collage of ideas for your enjoyment.

Black and White

Natural
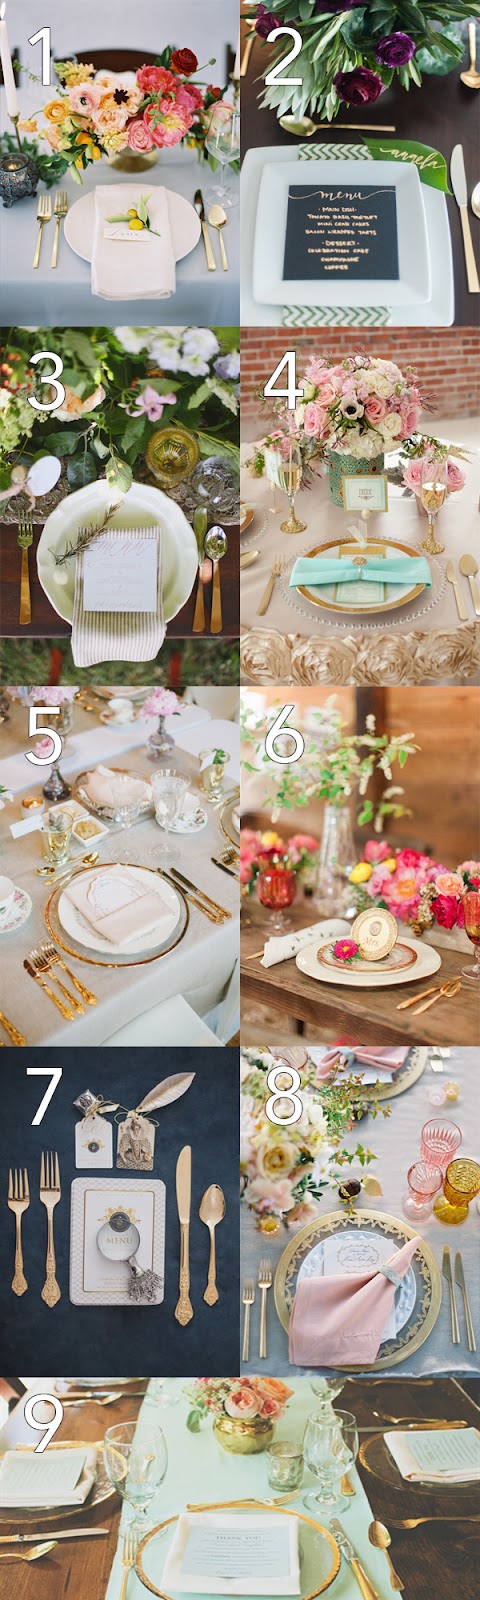
Tea Time
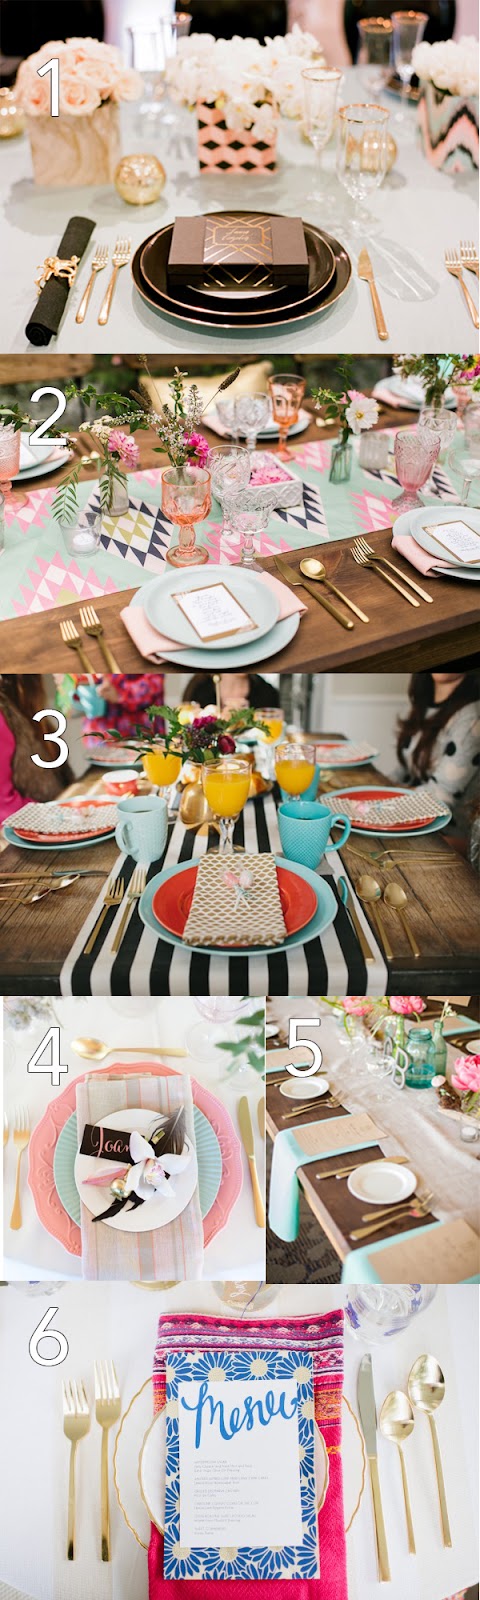
Mod
Thursday, October 30, 2014
Why I Painted my Walls the Color I Hate
Let’s talk about how much I loathe white walls. They're so institutional and blah, reminding me of rental homes where they paint the trim the same color as the wall so they don’t need to put any effort or money into paint. Why do they do this in rental homes anyway? Seems to me that white shows the most dirt and scuff marks, so they should paint the homes beige or black (I kid). To me, white walls are a cop-out. It says, “I couldn’t find a color that I like, so this will work.” Don’t get me wrong, there’s a time and a place for white- trim, cabinets, ceilings, prisons...
Now that I’ve officially offended 85% of Americans, let’s talk about the good aspects of white paint. In graphic design, there’s an area called negative space (or white space *wink*). It’s essentially the blank area of the page/website/whatever that doesn’t contain graphics or information. This can be a powerful tool to designers when they want to make a statement in their creation. They can use the white space as part of their design, sometimes making a bigger impact with more white than less. Ah ha!
I’m using white on my walls as a graphic designer would. As a statement. I want to accent the other furnishings in the space and highlight the colors in the other rooms. The area that I’m painting white is my entryway. When you look at a pass-through in a home, you need to make sure the color of the wall of the room you’re in complements the adjacent room’s wall color. Are you still with me? From the entry, you can see my kitchen, family room and hallway. Since I love color so much and plan on having a lot of it in the other rooms (the kitchen cabinets will be painted blue someday), I thought white would be a really great alternative to assaulting your eyeballs with a rainbow as soon as you walk through my door. Oh, but don’t worry, I have something up my sleeve…
Color on the ceiling! Since my realization that I can’t have everything in my house turquoise, I looked for another option to paint my ceiling. I eventually settled on coral and when I picked up a Valspar color inspiration booklet, it solidified my love for this color scheme. Check out this site for a visual. The color I settled on is Dark Mango, but seeing this post from The Smith Nest, I think I need to look for an alternative. Still, here is the color in Dark Mango (photo belongs to The Smith Nest) and the rest of my inspiration for the room:

I Love this plank wall by Shanty 2 Chic. Though mine will be a bit less “shabby chic”, I like the idea of having something rustic and something to break up the white. (I think it could easily be done with a box of vinyl flooring).

And these birds!! They tie in the geometric design from the light fixture (see below).

Adorable sign from Hobby Lobby that I MUST have. You’ll be able to see it as soon as you walk through the door. How happy is that?

Finally...the star of the show! This gorgeous geometric light from Urban Outfitters. When the light turns on, it casts super fun shadows on the wall. The color on the ceiling will draw your eyes up to this little beauty and you might just stand there in the entry admiring it for the rest of your visit. Maybe I should put a chair in there.

There you have it. And now I have white walls (photos of the finished entry yet to come). Tell me...what have you done to your home that you never thought you would?
Wednesday, October 22, 2014
Halloween Spiderweb Wreath

Ever hear of the word “Procraftination?” Well, the fact that I’m posting my Halloween wreath a week before Halloween is a prime example. I’m WAAAY behind in the craft world. In blogland, this should have been done a month ago. Like that wise person once said, “Better late than never!”
I seriously thought about saving this post for a whole year and actually having it prepared for next Halloween, but I just couldn’t wait to share it’s cuteness.
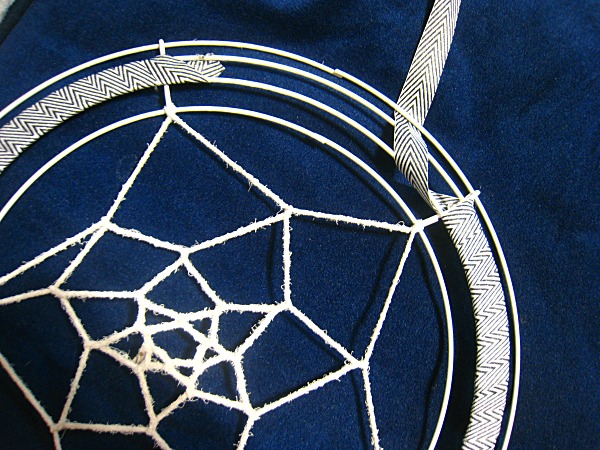
Have you noticed how popular wreaths are becoming among crafters? Maybe they’ve always been that popular and I’m just now noticing? I thought maybe I better take the plunge and make one myself. Essentially my wreath is just a dreamcatcher turned spiderweb. Come to find out, dreamcatchers are really easy to make, so this project can be done in an afternoon (which is good because you only have a week until Halloween!). I used a couple of pins from Pinterest to help me find what I was looking for. I had to look at a few tutorials before I actually figured out the dreamcatcher/web part. While it is really simple, it’s hard to make a tutorial to show the weaving process. Here are a couple of pins to look at: This one isn’t actually in English, but you really just need the photos to get a good grasp on it. In this tutorial from This Fashion is Mine, the loops are done a little different (that’s the one I used). I think it’s a little more secure than the other, but either is a fine choice.
You need a floral wire wreath to make your dream catcher. They don’t make these any any other color than green (that I’ve noticed), so you’ll have to spray paint it. I ended up making the spiderweb first and spray painting the entire thing. The wreath is essentially an extension of the web, so painting them both makes a more cohesive look.
The next step is applying the ribbon. I used about 3 yards of a ⅝ inch ribbon and overlapped it a little as I wrapped. If you use a thicker ribbon, you might not need to use as much, though I wouldn't recommend going too much thicker because it tends to pucker.
For the flowers, I found this tutorial from SNAP! for a sort-of ranunculus type flower and copied a couple of flowers from Kiki&Company’s wreath tutorial (which is absolutely amazing). The wreath tutorial requires a Cricut machine (which I currently don’t have), but it was simple enough to make without it. Just fold a small rectangular strip of paper in half and cut fringe along the folded side. Roll, glue and spread out the pedals to form the flower.
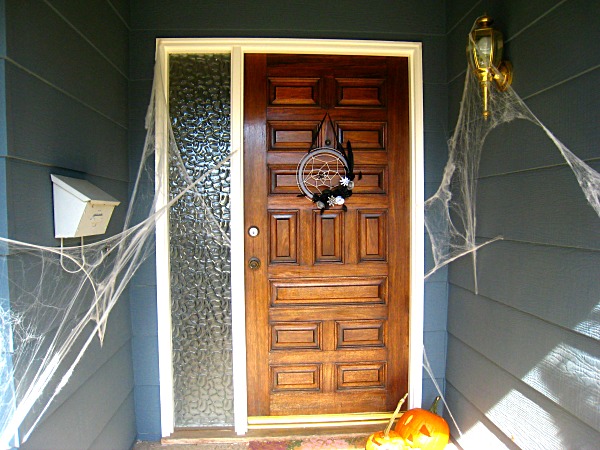
Once you have your flowers, start gluing (with hot glue. I assumed I wouldn't need to specify, but there's always that person)! It’s a little tricky to glue the flowers to the wire wreath and you’ll end up using a lot of glue, but the ribbon helps to have something to secure it to. Once you've got it glued, add your feathers (or your own embellishments).
Don’t forget your spider!

Wednesday, October 15, 2014
Breakfast Tacos

My favorite local Mexican restaurant has a dish called Huevos a la Abañil. It’s a scrambled egg dish served with warm tortillas and a side of rice and beans. My mouth is watering just thinking about it. I happened upon this meal when my boyfriend at the time took me to this restaurant for breakfast. I didn't even know they were open for breakfast and wasn't quite sure I wanted to venture out that far. I mean, Mexican food is great for dinner, but to me, seems a little inappropriate heavy for breakfast. I ended up ordering the safest thing on the menu and was completely surprised by it’s deliciousness. Why hadn't I had Mexican food for breakfast before!?
Since my family moved 5 ½ years ago, its safe to say I don’t get to eat there nearly as often as I’d like. Just recently we started growing jalapeños and I've been getting more creative with my recipes, trying to include them. Then...I discovered I can make something very similar to that breakfast dish! I changed it up a bit to make tacos instead of serving the eggs and tortillas separately. To me, it takes less time to eat which is a bonus.
Now, bear with me with this recipe. I normally don’t use fat in my cooking besides butter and oil, but I think using reserved bacon or sausage fat adds an additional element of flavor that’s almost necessary. If you don’t have any or are unwilling to use it, I’m sure butter would work just fine. I haven’t tried it, so I can’t say if it will be as tasty.
Ingredients
1 tsp rendered fat
2 eggs
2 corn tortillas
2 small or 1 large jalapeño, julienned
1 slice white onion cut in half
½ roma tomato, julienned
¼ cup Mexican cheese mix
salt to taste
Directions
1. Melt fat in small skillet. Add jalapeño and onion. Saute over medium heat until soft.
2. Whisk eggs in small bowl.
3. Add tomato to eggs and stir. Add salt as desired.
4. When jalapeño and onion are soft, reduce heat to medium-low, add eggs, stirring occasionally.
5. When eggs are finished cooking, divide evenly on warm tortillas.
6. Top with cheese.
Friday, October 3, 2014
Red Pepper Pasta with Crumbled Feta
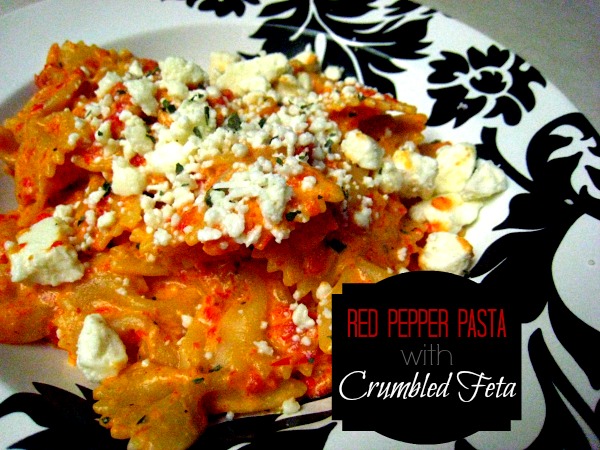
It’s weird how much I love red bell peppers so much, but loathe the green. They’re from the same plant! One is just on the plant longer than the other, but the result is a completely different taste. I made up this recipe after eating an amazing pink sauce from a local italian restaurant. Though it’s nothing like that sauce in taste, it does have an alfredo base, which is where the idea stemmed from. This recipe is a favorite among my picky eaters (not to say that yours will love it, but there’s hope) so it has become a regular in our dinner rotation.
The red peppers can be roasted ahead of time to make preparation even easier. I roast, seed and peel mine, then freeze them and dethaw when I’m ready to use. I usually don’t measure my ingredients before making this pasta, so bear with me and adjust according to your preferences. You want to make a strong flavored alfredo sauce so it still has full flavor when blended with the peppers.
Ingredients
16 oz (1 pound) farfalle pasta (I sometimes use whole wheat pasta which adds a hint of nuttiness and another dimension to the flavor)
3 roasted red peppers
2 Tbs butter
4 garlic cloves, minced
1 can evaporated milk
1 cup grated parmesan cheese
½ tsp salt
½ tsp dried basil
pepper to taste
Feta for sprinkling (if you’re not a fan of feta, you can use parmesan or mozzarella, but I highly recommend feta. The flavors compliment each other so well).
Directions
1. Cook pasta according to package directions.
2. In a separate saucepan, melt butter over medium heat.
3. Add garlic and sauté until fragrant.
4. Pour in evaporated milk and let set until heated through.
5. Once the milk is heated, add parmesan cheese, salt and pepper. Reduce heat and let simmer until thickened.
6. While sauce is thickening, blend roasted red peppers and basil in a blender or food processor.
7. When sauce is done, pour into blender with roasted red peppers and blend again. Return to pan to heat through. Salt again to taste.
8. When pasta is done cooking, drain and mix with sauce. Spoon into serving bowls and sprinkle feta on top.
Saturday, September 27, 2014
Before and After: Jessica's Bathroom
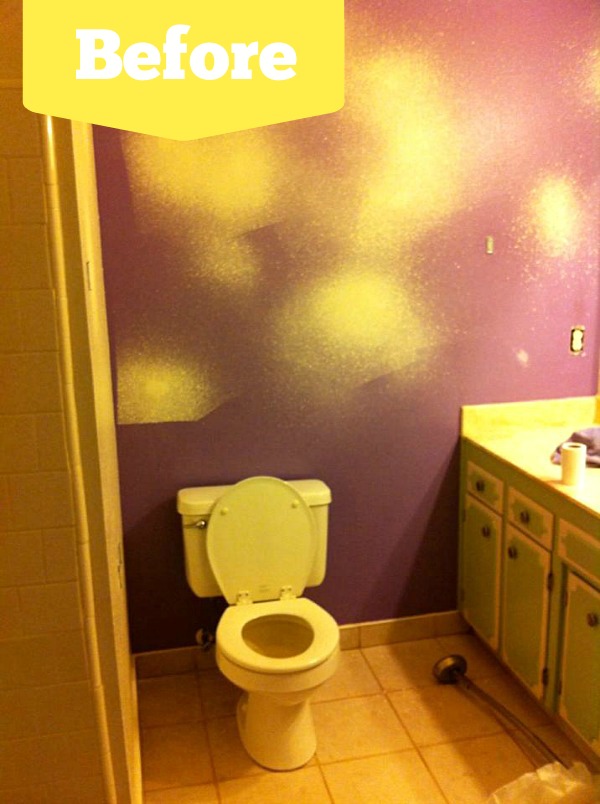
My friend Jessica is a mommy to 4 children and an amazing photographer. I’m not sure where she found the time to do her mini bathroom remodel , but she’s a crafty girl with an eye for a bargain and good design, so where there’s a will, there’s a way. Would you believe this whole bathroom remodel cost her a mere $83.50?! See the breakdown in what Jessica had to say:
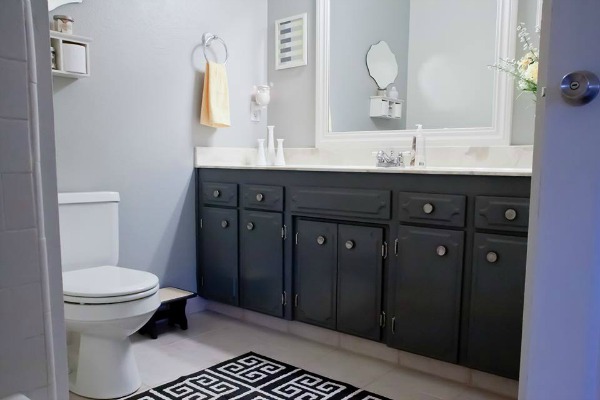
All the walls and ceiling were painted. The wall behind the toilet and mirror are a light shade of grey, the rest of the walls & ceiling are white ($2.50 for oops paint & leftover white from other rooms). Cabinets were painted a dark grey ($17). Mirror was cut down and framed ($5 to cut, $30 for framing). Repurposed flowers and new yellow ones ($2) and I got new hand towels ($2.50 for 2 at Target this week). I made the little framed art next to the mirror with free paint chips and frames I already had ($0)! New rug from Costco ($13). Mirror above toilet from Goodwill in Turlock, it was brand new in the packaging still ($7.50). Scrubbed the tile & grout today with some heavy strength grout cleaner we already had... it looks brand new! I have one last little project... I bought a large canvas from the thrift store for $4 (someone had started a painting but didn't finish it) that will have a quote of some sort stenciled on it. I'm very proud of how it all turned out... if only it would stay this pretty and clean... I'm sure the kids will have it smelling like a boy’s bathroom soon!
And here is the refreshing after…


Friday, September 26, 2014
Jalapeño Crack Dip

Here’s what I know...jalapeños are good. Dip is good. Jalapeño dip is awesome. Let me just tell you how much I love this dip. I could eat the whole bowl myself. I think about this dip the moment my husband pries it from my hands I practice the art of self control and put the remainder of what I haven’t gorged myself on in the fridge until the next morning when it’s a reasonable hour to eat dip (something tells me it’s not appropriate to eat dip for breakfast).
A few years ago, my hubby and I decided to try growing jalapeños in our garden. If you’ve ever had a garden, you know what it’s like to end up with an over abundance of a particular type of vegetable (zucchini growers say amen) which will leave you scouring the internet for hours to find a recipe for this specific ingredient. I tried jalapeño poppers, which were tasty, but a lot of work. I have two little ones that are 18 months apart. Ain’t nobody got time for that. After modifying and combining a few recipes, I came up with this fabulously addicting dip. I’m sorry. Youre welcome.
Ingredients
1 8oz. block of cream cheese at room temperature (I use reduced fat/neufchatel and it turns out just as tasty)
1 cup shredded cheddar cheese with extra for sprinkling (or cheese blend you prefer)
¼ cup sour cream
½ tsp garlic powder
½ tsp salt
½ cup roasted jalapeños
pepper to taste
Directions
- Preheat oven to 350°
- In medium bowl, combine cream cheese, garlic powder, salt and sour cream. Beat until smooth.
- Add in roasted jalapeños then cheese mixing one at a time.
- Scrape into small bowl and sprinkle cheese on top.
- Bake at 350° for 15-20 minutes until dip is bubbly and cheese is melted.
- Indulge!
Subscribe to:
Posts (Atom)