Saturday, September 27, 2014

Before and After: Jessica's Bathroom


Jessica's Bathroom before (text).jpg

 My friend Jessica is a mommy to 4 children and an amazing photographer. I’m not sure where she found the time to do her mini bathroom remodel , but she’s a crafty girl with an eye for a bargain and good design, so where there’s a will, there’s a way. Would you believe this whole bathroom remodel cost her a mere $83.50?! See the breakdown in what Jessica had to say:  

All the walls and ceiling were painted. The wall behind the toilet and mirror are a light shade of grey, the rest of the walls & ceiling are white ($2.50 for oops paint & leftover white from other rooms). Cabinets were painted a dark grey ($17). Mirror was cut down and framed ($5 to cut, $30 for framing). Repurposed flowers and new yellow ones ($2) and I got new hand towels ($2.50 for 2 at Target this week). I made the little framed art next to the mirror with free paint chips and frames I already had ($0)! New rug from Costco ($13). Mirror above toilet from Goodwill in Turlock, it was brand new in the packaging still ($7.50). Scrubbed the tile & grout today with some heavy strength grout cleaner we already had... it looks brand new! I have one last little project... I bought a large canvas from the thrift store for $4 (someone had started a painting but didn't finish it) that will have a quote of some sort stenciled on it. I'm very proud of how it all turned out... if only it would stay this pretty and clean... I'm sure the kids will have it smelling like a boy’s bathroom soon!

And here is the refreshing after…
Jessica's Bathroom-5.jpg

Jessica's Bathroom-4.jpg
Jessica's Bathroom-6.jpg

Friday, September 26, 2014

Jalapeño Crack Dip

Jalapeno Crack Dip.jpg


 Here’s what I know...jalapeños are good. Dip is good. Jalapeño dip is awesome. Let me just tell you how much I love this dip. I could eat the whole bowl myself. I think about this dip the moment my husband pries it from my hands I practice the art of self control and put the remainder of what I haven’t gorged myself on in the fridge until the next morning when it’s a reasonable hour to eat dip (something tells me it’s not appropriate to eat dip for breakfast).
 A few years ago, my hubby and I decided to try growing jalapeños in our garden. If you’ve ever had a garden, you know what it’s like to end up with an over abundance of a particular type of vegetable (zucchini growers say amen) which will leave you scouring the internet for hours to find a recipe for this specific ingredient. I tried jalapeño poppers, which were tasty, but a lot of work. I have two little ones that are 18 months apart. Ain’t nobody got time for that. After modifying and combining a few recipes, I came up with this fabulously addicting dip. I’m sorry. Youre welcome.


Ingredients

1 8oz. block of cream cheese at room temperature (I use reduced fat/neufchatel and it turns out just as tasty)
1 cup shredded cheddar cheese with extra for sprinkling (or cheese blend you prefer)
¼ cup sour cream
½ tsp garlic powder
½ tsp salt
½ cup roasted jalapeños
pepper to taste


Directions

  1. Preheat oven to 350°
  2. In medium bowl, combine cream cheese, garlic powder, salt and sour cream. Beat until smooth.
  3. Add in roasted jalapeños then cheese mixing one at a time.
  4. Scrape into small bowl and sprinkle cheese on top.
  5. Bake at 350° for 15-20 minutes until dip is bubbly and cheese is melted.
  6. Indulge!

Thursday, September 25, 2014

Before and After French Door Installation

 When my husband and I moved to our town back in 2009, I had decided that it was temporary and we’d “try it out,” and we definitely wouldn’t be raising our family there. A lot changes in two years I guess, because in 2011 we did what we said we weren’t and bought a house. It was a great time to buy because we could pay just as much for a mortgage as we could for rent. It just made more sense. So, here we are. Our new house is old and along with old, comes funky. It was built in 1969 and it shows. The selling feature that the realtor highlighted was that it had seven ceiling fans. Really? Is that they only thing you could come up with? Maybe she should have added that there’s only paneling on one wall. That would have been a good selling point.


 The cool thing about buying an old house is you can put your own fingerprint on it. We looked at newer houses and while, they’re nice and clean and new, they just aren’t our style (and the neighborhoods are questionable). We’d probably be tearing that one apart all the same. Despite all it’s unattractiveness, we’ve been told by several people that our new home was built really well, plus it has good “bones” and lots of storage (with the exception of walk-in closets).


 There’s such an exhausting list of things that need to be done to this house, it’s hard to know where to start. I’d say the first thing we did was paint the kids’ rooms and tear down those funky 70’s style custom made black-out curtains and accordion doors. All those little things made a difference, but what I really want to show you is the installation of our french doors. It’s the thing that has made the most impact on our living area so far (next will hopefully be flooring).


 We used to have one door opening up the the back yard, flanked by two large windows. Yes, the windows were large, but somehow the house still didn’t have a whole lot of natural light and felt really dark. We debated for quite some time on what window we would replace (and keep as a window) and what opening we would put the doors in. I thought the doors would be better put in the room that will one day be our dining room, but my husband thought they would be better going into the living room (Or is it family room? I can never keep those straight). Here’s a before pic of the wall to give you a better idea (watch for an upcoming post on that horrid fireplace). I apologize for the terrible angle, but you get the point.


Backyard wall before.jpg


 So here we are trying to figure out which window to turn into a door when...AH HA!...it occurs to me that we can make them both doors! Here we go...


Door Construction.jpg
Door construction (2).jpg


 That guy right there is my brother-in-law and owner of C3 Builders. I can’t tell you how grateful I am for him. He (along with the help of my hubby and dad) finished the installation of both doors in one day. Yep! He’s pretty awesome.


 And now the reveal…
French doors after (edit).jpg


Aaaaaaaaawww! Can’t you just hear the angels singing? Now it’s time to do something about that horrible carpet.

Sunday, September 21, 2014

Punch-A-Prize

 Awhile ago we started buying cleaning wipes from Costco. You know, the Clorox or Lysol kind. Well, I began collecting the empty containers thinking there must be something I can use these for. I guess I was using an abnormal amount of wipes cleaning a lot because I they piled up pretty quickly. I had quite the collection when it came time to plan a birthday party. This might be a good time to pause and tell you how I feel about goodie bags. There’s the kind of mom who loves goodie bags. They’re simple, pre-packed (most of the time) and fairly inexpensive. They love to send the attending kids home with a “thank you for coming” gift and I think that’s great. I do too. Then, there’s the kind of mom like me, who loathes goodie bags. The kids come home with these candy-filled bags with cheap toys that they play with for 10 minutes, then leave scattered all over the house. Being the frugal person that I am, I don’t like to throw things away, so there they go, into the toy bins on the bookshelf to waste space. In the end, it’s all about the kids, so I graciously take the goodie bag and ohh and awe over what’s inside as my children pluck each one out of the bag and throw it on the floorboard of my car. I’m not trying to bash the goodie bag mom. I’m just trying to come up with more original prizes the kids can use (or use up) and not be hated by other moms like myself.

 Back to party planning. I didn’t have a pinata and I had tons of these wipes containers (and a severe hatred for goodie bags). That’s when the Punch-A-Prize was born!

 I don’t know whether to call it a game or some sort of prize dispenser. We’ve used it to let the winner of each party game get their prize. I suppose it could be a game in and of itself. It’s like a pinata, in a way. The kids have to do some sort of activity to get the prize out. Perhaps that’s why the love it so much. And love it, they do!

Supplies:
Foam core board
9 empty wipes containers (without lids)
Tissue paper
Scissors
Exacto knife or box cutter
Wrapping paper (optional)
Prizes

Step 1
Step 1.jpg

 Draw a grid on what will be the backside of the foam core board. You’ll want to end up with a 3x3 grid (you’ll actually end up with a 3x4 because the board isn’t a square). If you’re not a perfectionist, you can just eye-ball this part to save time. Place your containers upside down between each square until they look even. Trace the containers and cut. Note: you want to put the containers upside down because you’ll be punching them through the holes you cut. The bottoms of the containers are smaller, so it won’t work right if you cut the holes from that end.

Step 2
Step 2.jpg

 I re-used this board from another party, so at this time, I covered it in wrapping paper and re-cut the holes. If you want, you can do this in step 1 before you cut the original holes.

Step 3

Step 3.jpg

 Fill your containers with prizes. I used pretty neutral prizes (silly string, pop-its and chocolate coins), but since this was for my daughter’s party, I had some girly ones stuffed in there too. She still had boys at her party, so  I’ll show you how to deal with it if you have a mix-gendered party.

Step 4
Step 4.jpg

 Cut some tissue paper a little larger than the container opening. Here’s the part, if you have prizes that are geared specifically toward one gender, you can coordinate the color of your tissue paper with the prize inside (i.e.- pink for girl prizes, blue for boys and white for either). Note: you only need one layer of tissue.

Step 5
Step 5.jpg

 Cover the container opening with tissue and punch it through the back of the foam core board. It’s easiest to do this one at a time with the container on a flat surface and the board on top. Be sure to press on the board right next to the container or you risk breaking the board. Once you poke them all through, you’re done! Note: If the tissue is on the thicker side, it may be a little hard for the little ones to punch through. You can solve this problem by poking a tiny hole in the middle with a straight pin. Also, this can be pretty tricky to place, so I used my daughter’s easel frame and it worked perfect!


 Since I forgot to snap a pic of the final product, here’s the aftermath. She had a Frozen themed party, so I decorated it with some sparkly snowflakes.

After.jpg

 Here’s another one that I’m embarrassed to show you I didn’t have a lot of time to invest in. I’d love to see your own rendition!

Final.jpg

Friday, September 19, 2014

Disney's Frozen Paper Medallion Tutorial

 IMG_6686.JPG
 
 I live in a town without a party store. Yep, that’s right. If we want party supplies we’re left to the big box stores like Walmart and Target which can leave us a little short-changed if we’re looking for something specific, or we need to go to the nearest (bigger) town with one which is about 30 minutes away. Even then, a party store might not have exactly what I’m looking for and I usually procrastinate to the point where it’s too late to order online.  I’m also one of those people who doesn’t like a really bold theme with characters plastered on every party supply and decoration.
 These are the reasons I’ve resorted to making most of my own decorations. I feel like I can make something that costs less and looks a whole lot better.
 One of the things I’ve made for a couple of my daughter’s parties have been the paper medallion. Yes, there are already several tutorials on the subject, but I’m not going to reference any of those because I feel like I’m original  I made these on my own before I saw any tutorials. I’ve taken lots of pictures to hopefully help you out, but bear with me because my camera sucks I need a new camera.


Here are the supplies you need:
4  8 ½ x11 sheets of paper or 3 12x12 per medallion
Glue gun
Ruler
Scissors, paper cutter or Exacto knife
Cupcake toppers or something else to put in the middle
Tulle or other embellishment


Helpful, but not necessary supplies:
Bone folder
Paper edge punch or decorative scissors


Step 1
Step 1.jpg


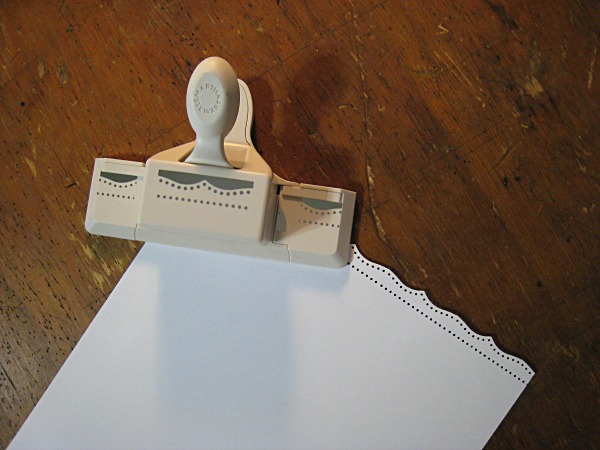
 If you’d like a decorative edge on your medallions do that first. I used a simple Martha Stewart paper edge punch, but you can use some decorative scissors too. Just be sure to keep your edges straight, of you won’t have a perfectly round circle. I loved this on the plain white paper, because when it’s all done, it looks like a snowflake! Some sparkly paper would be even better!


Step 2
Step 2.jpg


 Cut ½ inch off the width of your paper if you’re using a standard 8 ½ x11. Because you’re going to be folding these in 1 inch folds, that ½ inch just doesn’t work. If you’re using a 12x12, this step isn’t necessary.


Step 3
Step 3.jpg


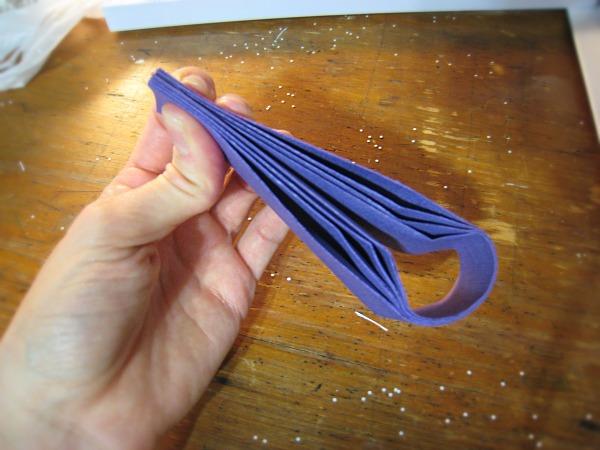
 Using your bone folder (or if you don’t have one, a ruler), make a fold every inch down the length of your paper, then fold your paper accordion style. Note: there’s no need to try and flip the paper and make offset folds on both sides. The folds will bend forward and backward and you’ll save tons of time by just doing them all on one side of your paper.
 When folding, be sure to keep your paper as straight as possible and try to keep the spacing between the folds as even as possible.


Step 3 (2).jpg


 Sometimes you’ll end up with one edge that’s folded “up” and one edge down, like the picture above (especially if you accidentally forget to cut that ½ inch off in step 1). Preferably, you would have both edges facing down, forming a sort of “M” shape, but you can work with it if it does this. You’ll see why once you start gluing it together.
Step 4
Step 4.jpg
 
 Fold your paper in half, making sure the inside edges are down and the tops are even. If you wind up with the ends of your folds going opposite directions (like the picture in step 3), make sure in this step that the edge pointing “up” goes on the outside when you fold your paper in half, and don’t glue two “up ends” together (in step 5).


Step 5
Step 5.jpg


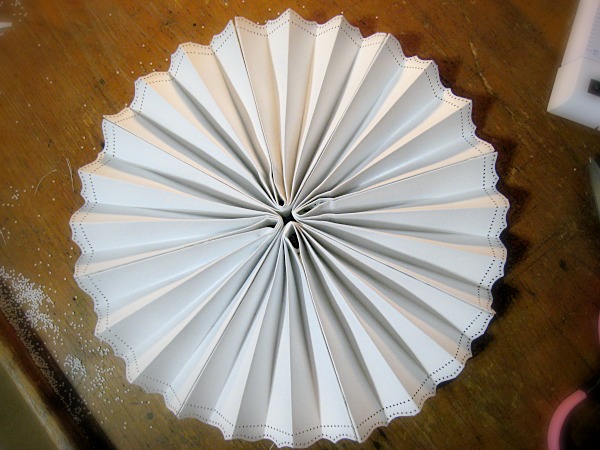
 Once you have all your papers folded and ready, start gluing the inside edges on each individual sheet, then glue each paper to the next. You’ll want the folded peaks to be seen on the upside and the raw open ends on the underside. Make sure the tops of the folds are nice and even when gluing. If you find you have one end that’s longer or shorter than the other side, simply make sure that one is hidden in the back of the medallion. As long as you glue the top edges of the folds straight, it will look just fine. Once it’s all glued, it should end up looking like this:

Step 5 (2).jpg


Step 6
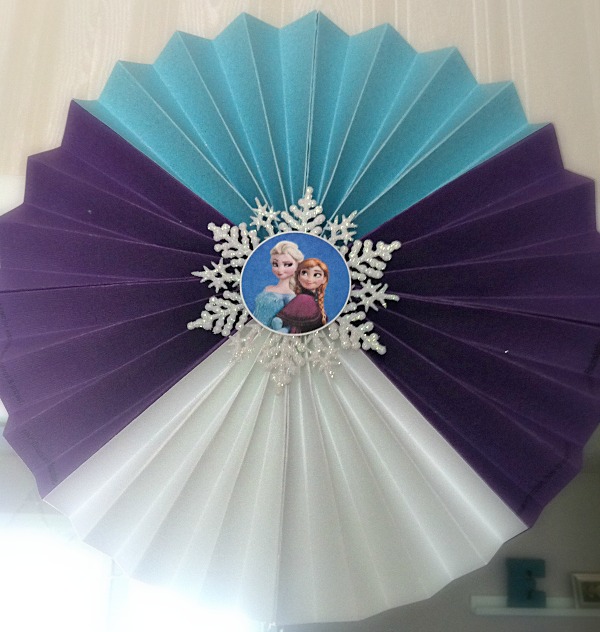
You can leave your medallion looking all funky in the middle like this, or finish it off with some embellishments in the middle. I used tulle, plastic snowflakes from Hobby Lobby and some Frozen themed cupcake toppers found on Great Kids Birthday Parties blog. I have a two inch punch, so those were perfect, but if you want to go a little bigger, these toppers found SKGaleana would look amazing. Print on cardstock.

Step 6.jpg


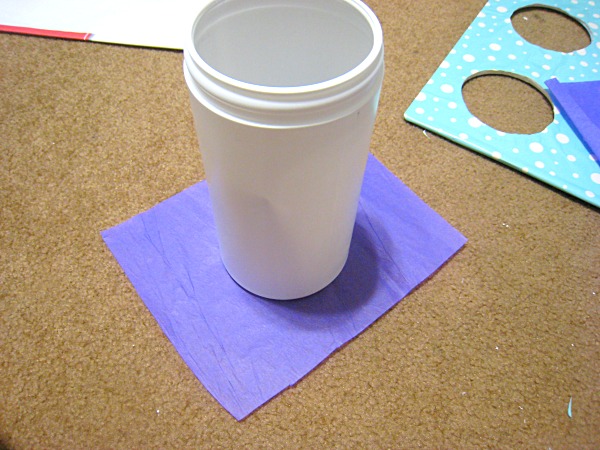
 For the tulle, cut appx 15 inches from a roll, accordion fold lengthwise (just gather it up with your fingers, this doesn’t have to be perfect), then pinch and tie in the middle. When the tulle unfolds, it will create its own little medallion. Hot glue to the middle of your paper medallion. Then, glue one of the cupcake toppers you printed out earlier on top of the tulle (or snowflake, or whatever you desire). Voila!


 Yes, there are a  LOT of instructions. It all seems very technical until you actually do it and understand the steps. You’ll be pumping them out in no time! Here are some more pictures of the ones I used for my daughter’s Frozen party. Enjoy!


Paper Medallion.jpg
Ana.jpg


Again, I apologize for the crappy photography out-of-date camera

Sisters.jpg

Finally...here’s a pic from my daughter’s ballet themed party that I used 3 12x12 inch papers. I like using the 12x12 better, but that’s just my preference.

ballet medallion.jpg

Thursday, September 11, 2014

Honey Mustard Mayo

Do you struggle with what to feed party guests as much as I do? Pizza is such a popular party food, but not always the healthiest choice. I was faced with this dilemma and decided to get sandwiches from Costco. Boy, am I glad I did. They come on lovely croissants and are pre-cut, so the kiddos can have half and they adults can grab more if they want. The thing that I really loved about their platter is that it came with two small containers of spreads you can put on your sandwich. One was a chipotle-type spread and the other, a honey mustard mayonnaise. I tell you, once it dawned on me that I can make the honey mustard mayo myself, I haven’t put anything else on my sandwiches since then! It’s the easiest, quickest tastiest condiment I’ve made. Sure, you can go to the store and pick up a bottle, but you can’t really customize that to your taste buds and you can make your own with real mustard, real honey and real mayonnaise. I suppose you could try and make your own mayo if you want, but I just don’t have that kind of faith in myself time. I put this stuff on every sandwich, but you could probably get really creative and try it on baked chicken or something. You only need three ingredients:

Honey-mustard mayo.JPG

Ingredients
½ cup Mayonnaise (light, if you prefer)
1 Tbs Spicy Brown Mustard
1 Tbs Honey


Directions
1. Let’s face the facts, you don’t really need directions for this, but if you do, proceed to #2
2. Mix all ingredients together in a small bowl. Adjust mustard and honey according to your preference. Store in the refrigerator.

Enjoy!

Monday, September 8, 2014

What's My Job?

So...I've got a blog. As I'm picking out fonts, font color, layout, pictures, sizing and just trying to not be overwhelmed making this blog overall attractive, I come to a little section in my Google+ profile that asks me about my job. If you know me, even as an acquaintance, you would know that I'm a stay at home mom. I thought about trying to write some sort of funny description about what I do, such as: chef, chauffeur, teacher, crafter, maid, etc., but that's all been done before in a much more humorous way than I could ever write and let's just face the facts...I'm just not that witty. Instead, what I wrote in my job description was the first thing that came to my mind. It reads: Raising up two members of the next generation to be contributing members of society. Hmm. That sounds like I actually know what I'm doing! This got me thinking. What does it actually mean to raise contributing members of society?
I suppose to do this, I must first and foremost teach my children what they're here for. What does our existence mean and why are we here? Easy enough, right? Ha! I am in no way qualified to answer that age-old question. The best I can do is to teach them what I know. What the Bible says is true. What many of us Christians know as The Great Commission. Matthew 28:18-20 says, "Then Jesus came to them and said, 'All authority in heaven and on earth has been given to me. Therefore go and make disciples of all nations, baptizing them in the name of the Father and of the Son and of the Holy Spirit, and teaching them to obey everything I have commanded you. And surely I am with you always, to the very end of the age.'"  I am to raise my children first and foremost to know Jesus and to help them tell others about Jesus. Now, I could go on and on about the struggles that we will face meeting this criteria, but for the sake of time and attention spans, lets leave this as-is to be #1 on the list. While we're at it, let's put this into a reader-friendly list form.
  1. Teach my children about Jesus and help them tell others about Him.
  2. Vote. -Someone once told me this is what it means to them to contribute to society and it really struck a chord with me. It is not something I am not very good at. I like to stay blissfully ignorant on politics (I know I'm getting a lot of scoffs and eye-rolling right now). I'm not going to be a blind voter, so I usually don't vote. *gasp* Guess I really gotta step up my game on this one.
  3. Reduce your "carbon footprint." -Our city recycles, so we're covered on this, right?
  4. Give back. -I plan to, in the near future, get my children into some sort of volunteer activity. I think it's important for children to know the meaning of giving and helping the less fortunate. Some day I hope to take them on a missions trip.

There we have it. Not a huge list, but an important one. Notice it doesn't have anything about being a rocket scientist or earning over 100k/year? Good! As long as my children love the Lord, have good morals and don't wind up in jail, I'll consider myself a success. I'd love to hear your thoughts on what could be added to my list!